Pages

Thursday, March 31, 2011

April Fool! {Lemon Fool}


What better way to welcome April and Spring than with my lovely, refreshing April Fool! No surprises in store here, just a light and creamy delicious treat!

250ml whipping or double cream
1 tsp caster (berry) sugar
125ml Greek yogurt
Zest of ½ lemon plus squeeze of juice
125ml lemon curd
Lemon zest & ginger biscuits to serve

Lightly whip the cream with the sugar until you have lovely soft peaks – be careful not to over whip – then fold in the Greek yogurt, lemon zest and a squeeze of lemon juice. Taste to check it is sweet and lemony enough and adjust to your tastes if needed. Gently fold in the lemon curd to create a ripple effect. Spoon into glasses or individual serving dishes and chill.

When ready to serve top with some long strands of lemon zest and serve with ginger biscuits on the side for a delicious, fast and easy dessert.


Coronation Chicken Cups

For the last of my Afternoon Tea recipes collection, I couldn't resist a take on Coronation Chicken. Here I've served it in crispy wonton cups for a slightly modern spin on a true British classic. Elegant and a real crowd pleasure these take no time to make but be prepared – they will go in a hurry!

Makes 12 cups (and enough sauce for up to 24)

12 wonton wrappers
Olive oil
2 cooked chicken breasts*
125ml mayonnaise
125ml natural or Greek yogurt
1 tbsp curry powder
2 tbsp mango chutney
Squeeze of lemon juice
2 tbsp coriander, chopped,
Freshly ground black pepper

To garnish:
Whole coriander leaves
thinly sliced red onion (only need a couple of pieces per cup)

Pre-heat the oven to 350F/ 180C.

Brush the oil onto each wonton wrapper then place into a muffin or cupcake tin. Put in the oven for 5-7 minutes until golden and crisp. Once cooked transfer to a wire baking rack to cool and set aside.

In the small bowl of a food processor (or you could use a hand-held blender or blender) mix together the mayonnaise, yogurt, curry powder and mango chutney. Add a good squeeze of lemon juice and a good grinding of black pepper. Puree until smooth then add the chopped coriander. Stir well then taste to check the seasoning and adjust if needed.

Shred up the chicken breasts and put into a medium sized bowl then add half of the sauce to the chicken. The amount of sauce needed will depend on how big the chicken breasts were that you used. Add as much as you like then stir well. Spoon the mixture into the wonton cups then top with a coriander leaf and a few shards of red onion.

*To cook the chicken I drizzled it with a little olive oil and seasoned with some salt and pepper, before roasting it in the oven at 350F/ 180C for 20-25 minutes, depending on the size of the chicken breasts. Leave to cool completely before shredding.

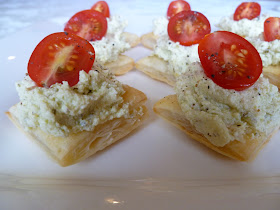
Goats Cheese & Pesto Bites

Continuing with my Afternoon Tea theme another savoury recipe to add to the collection. These little bites are delicious and elegant and the perfect accompaniment to serve with all of the other treats. Even better, they take no time to make at all!

1 sheet of ready rolled puff pastry
140g goats cheese*
2 tbsp pesto
Squeeze of lemon juice
Drizzle of Extra virgin olive oil
Freshly ground black pepper
Cherry tomatoes, halved

Pre-heat the oven to 400F/ 200C.

Sprinkle some flour onto a large chopping board then unroll the puff pastry. Sprinkle a little extra flour on top of the pastry then cut it into small bite-sized squares. Using a fork prick holes all over each square, then bake in the oven for 10-12 minutes until golden. Remove from the oven when ready and allow to cool.

While the puff pastry is cooking make the topping. In a small bowl mix together the goats cheese, pesto, lemon juice, olive oil and the ground black pepper. Mash well with a fork so that it is evenly mixed then set aside.

When ready to assemble put a small spoonful of the goats cheese mixture on each square then top with half a cherry tomato. Season with a little salt and pepper and serve.

*You don't have to be too precise with the quantity of goats cheese. It just so happens that the log of cheese that I buy comes in 140g packets. If they type you buy is sold in 150g packets then use that – it's not a fussy recipe (they just look it!).

Tuesday, March 29, 2011

Lemon Coconut Bars


Continuing with my Afternoon Tea theme for Mother's Day (April 3rd in the UK) here are my quick and easy Lemon Coconut Bars. Irresistibly zesty, sticky and sweet, they won't last long!

Lemon Coconut Bars

225g/ 8oz digestive biscuits
115g/ 4oz butter
Small tin of condensed milk*
115g/ 4oz unsweetened dessicated coconut
Zest and juice of 1 lemon
115g/ 4oz Icing sugar
55g/ 2oz toasted coconut for topping (optional)
Extra lemon zest for garnish (optional)

Line a square pyrex dish or other medium sized square tin with cling film then set aside.

Crush the digestive biscuits, either in a food processor or in a sandwich bag with a rolling pin until you have fine crumbs.

In a medium sized pan melt the butter with the condensed milk. Once melted mix in the crushed biscuits, coconut and the lemon zest. Press the mixture into the dish and put into the fridge to chill for 30 minutes.

While the lemon bars are chilling make the icing. Sift the icing sugar into a medium sized bowl then add 2 tbsp of juice from the the lemon and stir until you have a smooth fairly thin icing that you can drizzle. Once the lemon bars have chilled drizzle over the icing then sprinkle over the toasted coconut and lemon zest if using. Return to the fridge to chill again (if you are in a hurry you can stick them into the freezer quickly) then cut into bars and serve with a cup of tea.

*In Canada the tins I buy are 300ml which works out at about 385g. A little less than the 397g size of tin you get in the UK but definitely not worth opening another tin for! Use either depending on where you live. These bars are definitely sticky and I recommend keeping them in the fridge. If you would prefer a firmer bar simply use less condensed milk - I like them sticky so use the full amount but for a firmer bar I would suggest cutting it down to 315g/ 11oz. Enjoy!


Tuesday, March 22, 2011

Classic Scones with Clotted Cream & Wild Rose Petal Jam

I absolutely love afternoon tea. When we were younger every now and then as a special treat on a Sunday, mum would make us a full Afternoon tea (or High Tea as it can also be called). We would literally walk into the kitchen and the table would be covered with freshly made, still warm scones, our favourite sandwiches cut up into perfect little triangles or fingers, a classic Victoria sponge (or sometimes a chocolate cake), lemon bars or tiffin cake and sometimes a quiche or other savoury treat. Since Mother's Day is approaching in the UK (April 3rd) I have decided over the next couple of weeks to make some recipes that when put together will make the perfect afternoon tea- an ideal treat for your mum on Mother's Day!

On top of that I recently received an email from Foodbuzz who are partnering with Electrolux and Kelly Ripa to raise money for the Ovarian Cancer Research Fund by hosting a Top 9 Takeover Tea Party. For every post created with a Tea Party theme, Foodbuzz with donate $50! Yes $50! But there's more!! You too can help raise money for such a good cause. By going to the Electrolux website you can pick the perfect outfit to wear to Kelly Ripa's Tea Party For A Cause. For every outfit picked Electrolux with donate $1 to the Ovarian Cancer Research Fund. It's for such a good cause so take a moment, pick a fun outfit and help raise some money!

So with two great reasons to post some Afternoon tea/ Tea party recipes, what better recipe to start with than my classic fruit scones! I have used Wild Rose Jam as I have been desperate to use it for a while, but you could easily stick to traditional strawberry or raspberry jam – whatever is your preference. The important thing is to try and eat these while they are still a little warm, with of course, a nice pot of tea!

Classic Scones with Clotted Cream & Wild Rose Petal Jam


Makes roughly 10 scones

225g/ 8oz self-raising flour
2 tsp baking powder
55g/ 2oz unsalted butter
30g/ 1oz fine granulated sugar (caster)
1 egg
Milk

Preheat the oven to 220C/ 425F/ GM 7. Line a baking tray with parchment paper and set aside.

Sieve the flour and the baking powder into a large bowl, then add the butter in small pieces and rub into the flour with your fingers, until the mixture looks like fine breadcrumbs. Add the sugar and stir well. Beat the egg in a jug and add enough milk so that it comes to 150ml/ 5fl oz. Add the egg and milk mixture a little at a time to the flour mix as you may not need it all and mix it so that it is nice and soft. Turn out on to a lightly floured work surface and continue to knead lightly until it is smooth and not sticky.

Roll out to approximately 2cm (3/4 inch) thick and then using a round cutter approximately 5cm/ 2inches in diameter cut out the scones and place on the lined baking tray. Using any leftover milk and egg mix, brush the top of each scone. If you don’t have any egg mix left simple use a little milk. Bake in the oven for 10-12 minutes until they are nice and golden on top.

Remove from the oven and leave to cool slightly on a wire rack.

Eat while still warm topped with a good spoonful of clotted cream and jam (or if you prefer butter and jam) and a good cup of tea!

Tea Party Sandwiches

As mentioned in the above post this post is also being submitted for the Electrolux and Foodbuzz Top 9 Tea Party Takeover to help raise money for the Ovarian Cancer Research Fund. Don't forget to click here to chose your tea party outfit – it's for a great cause so please take a moment. It doesn't cost you anything other than 2 minutes of your time so please click and pick!

It is impossible to have a proper Afternoon tea without dainty little sandwiches! And of course the ultimate classic tea party sandwich....the quintessential English Cucumber Sandwich. I have two versions here – the classic Cucumber and cream cheese sandwich as it should be without any tweaking or modernising and of course an updated fusion twist... cucumber sandwich with wasabi and lime cream cheese. Both are delicious – take your pick of which version you prefer.

And my second sandwich – another elegant favourite, my smoked salmon with dill and lemon cream cheese sandwich. If you like you could also add a little watercress to these sandwiches.

Classic Cucumber Sandwiches

Makes 12 finger sandwiches (easily doubled)

6 slices of white bread, crusts removed
½ English cucumber, thinly sliced
90g cream cheese, at room temperature
Freshly ground black pepper

Put a little cream cheese on each slice of bread then grind over a little black pepper. Top with the sliced cucumber, then place another piece of bread on top before cutting into fingers.

Cucumber Sandwiches with Wasabi & Lime Cream Cheese

Makes 12 finger sandwiches (easily doubled)

6 slices of white bread, crusts removed
½ English cucumber, thinly sliced
90g cream cheese, at room temperature
Pea sized amount of wasabi paste
Zest of 1 lime and a squeeze of juice
Freshly ground black pepper

In a small bowl combine the cream cheese with the wasabi, lime zest, juice and a good grinding of black pepper. Mix well then spread over each slice of bread. Top with the sliced cucumber, then place another piece of bread on top before cutting into fingers.


Smoked Salmon Sandwiches with Dill & Lemon Cream Cheese

Makes 12 finger sandwiches (easily doubled)

6 slices of brown bread, crusts removed
90g cream cheese, at room temperature
1 tsp fresh dill, finely chopped
Zest of 1 lemon and good squeeze of juice
Freshly ground black pepper
90g smoked salmon
Watercress (optional)

In a small bowl combine the cream cheese with the dill, lemon zest, juice and a good grinding of black pepper. Mix well then spread over each slice of bread. Top with the smoked salmon then squeeze over a little lemon juice and a grinding of black pepper. Add some watercress if using then place another piece of bread on top before cutting into fingers.

Monday, March 21, 2011

Coffee Cupcakes with Irish Cream Buttercream

These delicious and indulgent cupcakes are for adults only! Packed with a real punch of coffee and topped with delicious and sweet Irish cream liqueur they certainly are a treat.

Makes 12 cupcakes

120g plain or all-purpose flour
70g caster or berry sugar
70g light brown sugar
1 ½ tsp baking powder
a pinch of salt
40g unsalted butter, softened
1 tbsp instant espresso powder
120ml milk
1 egg

Buttercream Icing:
250g icing sugar
80g unsalted butter, softened
3 tbsp Irish Cream liqueur
a few drops of vanilla extract

Chocolate covered coffee beans or plain coffee beans to decorate (optional)

Preheat your oven to 170C/ 325F/ GM 3 and line a cupcake tin with medium sized paper cases.

Place the flour, sugars, baking powder, salt and butter into the bowl of a KitchenAid (or other freestanding mixer) and using the paddle attachment mix slowly until everything is combined and you have a sandy consistency (if you don't have a KitchenAid use a hand-held electric beater). Add the espresso powder to the milk and stir until dissolved. Add the vanilla to the milk and coffee then while the mixer is running, slowly pour in the milk and mix until it's just incorporated, then add the egg and continue beating until it's mixed in. Scrape down the sides of the bowl to make sure everything is properly mixed but be careful not to over beat the mixture.

Evenly spoon the cake mixture into the cupcake cases and bake for 20-25 minutes until the sponge bounces back when touched (with my oven 22 minutes works perfectly every time) and a skewer comes out clean when put into the centre of the cake. Leave to cool for a few minutes then transfer the cupcakes onto a wire rack.

To make the icing sift the icing sugar into the bowl of a free-standing mixture or large bowl, then add the butter and beat on a low setting until it comes together. Turn the speed up a little and continue beating until it is well mixed. Turn it back down to low then add the Irish cream liqueur and the vanilla extract and mix until it is well combined and smooth, then turn up to a higher setting and beat for roughly 5 minutes until the icing is light and fluffy.

Once the cakes have completely cooled ice them with the buttercream icing then top with the espresso beans if using. Serve with a cup of tea, coffee or for an extra indulgent evening treat with a glass of Irish Cream liqueur!

Tuesday, March 15, 2011

Spinach and Pea Salad with Goats Cheese

A lovely light and refreshing salad, ideal for spring days! This pairs really well with my Shepherd’s Pie recipe but it is also delicious with many other dishes.

150g/ 5oz (approx.) frozen peas
85g/ 3oz baby spinach
55g/ 2oz soft goats cheese
good squeeze of lemon juice
drizzle of extra virgin olive oil
Salt & freshly ground black pepper

Cook the peas in a boiling salted water until tender. Once ready, drain and allow to cool. Arrange the spinach leaves on a serving dish then scatter over the cooled peas. Crumble over the goats cheese then squeeze over the lemon juice and drizzle with the olive oil. Finish with a good grinding of pepper and a pinch of Maldon sea salt and serve.

*If you don't like goats cheese it is also delicious with shaved Parmesan.

Shepherd's Pie

For some reason there always seems to be a lot of confusion between Shepherd’s Pie and Cottage Pie – they are both very similar but the one big difference is Shepherd’s Pie is made using lamb and Cottage pie, beef. So if you aren't a fan of lamb you can certainly make this with minced beef instead, just make sure to call it a Cottage Pie! Regardless of which version you make one thing for sure is that this is absolutely delicious comfort food at it's best.

I like to serve this with a simple spinach and pea salad – perfect!

2 tbsp olive oil
1 onion, finely diced
2 cloves of garlic, crushed
2 sticks of celery, finely chopped
1 carrot, finely chopped
500g minced (ground) lamb (the best quality you can get)
1 tbsp flour
250ml passata or crushed tomatoes
1 tbsp tomato puree
1 tbsp Worcestershire sauce
2 tsp balsamic vinegar
250ml beef stock
leaves from a few sprigs of thyme
2 bay leaves
Salt & Pepper
1 tbsp fresh parsley, finely chopped

750g peeled potatoes
30g butter
90-105ml (6-8 tbsp) milk
1 tbsp parsley (optional)
Salt & pepper

Heat the oil in a large pan then sauté the onion over a medium heat for 5 minutes until it has started to soften but not coloured. Add the celery, carrot and garlic and continue to cook for another 5 minutes before adding the mince, breaking it up as it cooks. Cook over a medium-high heat until all of the mince has browned then sprinkle over the flour. Cook for at least a minute then add the passata, tomato puree, Worcestershire sauce, balsamic vinegar, beef stock, thyme and bay leaves. Season with salt and pepper, stir well then leave to simmer for 35- 45 minutes, stirring from time to time to make sure it doesn't catch on the bottom, until the sauce has reduced and thickened – don’t be tempted to have it too runny as it will make the potatoes soggy.

While the sauce is cooking boil the potatoes in salted water until tender and then drain and mash them with the milk, butter, salt and pepper until smooth and creamy. If using add the parsley to the mashed potatoes.

While the potatoes are cooking pre-heat the oven to 400F/ 200C.

When the meat sauce is ready, remove the bay leaves then add the parsley. Check the seasoning then transfer to an oven-proof casserole dish. Top with the mashed potato then cook in the oven for roughly 30 minutes until the potato is golden and starting to crisp slightly and the sauce is bubbling at the side.

Leave to cool for a couple of minutes before serving with the spinach and pea salad.

(Sorry - the pics aren't the best, but it was dark and we were all hungry!!!)

Friday, March 11, 2011

Happy Birthday 'Top Hats'!

For as long as I can remember if there was a Birthday in our house there were 'Top Hats' - one of my mum's specialties that were loved by all. I have continued with the tradition and so for Wee One's first Birthday they of course had to feature! As I mentioned in my January post 'I'm back!' it was Wee One's Birthday on the 27th of December so we marked the special occasion with a proper kid's Birthday Party. It was only right therefore that Top Hats were on the menu – even if they were for the benefit of the adults! I haven't yet had a chance to post the recipes from over Christmas but since today is my mum's birthday I just had to make them to celebrate!

Happy Birthday Mum – hat's off to you!! ; )

Makes 15 Top Hats {14 if you want to lick the chocolate bowl!} (Easily doubled or tripled!)

100g good quality milk chocolate
15 marshmallows
15 Smarties
15 Small Paper Case

Melt the chocolate in a bowl over a pan of barely simmering water. When melted place a teaspoon in each paper case so that the bottom is completely covered. Put a marshmallow on top of the chocolate then add a little bit of chocolate to the top of the marshmallow add top with a Smartie. Leave to set then serve and enjoy! A fun treat for everyone.

(And incase you're wondering why they are called 'Top Hats'....... peel off the paper case to reveal a fun and tasty 'top hat'!).......

A few photos from Wee One's Birthday Party ......


Monday, March 7, 2011

Pink Champagne Truffles {And Awards Season}


Last weekend I was delighted to receive not one but two blog awards from fellow bloggers! As it turned out I was given them just as the red carpets were being unrolled in Hollywood for the Oscars so I decided it was fitting therefore to make something glamourous, chic and Oscar-worthy to honour the end of the awards season and my own first awards!

Makes roughly 16-18 truffles

225g good quality milk chocolate
15g butter
100ml double or whipping cream
Small pinch of salt (I use Maldon)
60ml pink Champagne

To decorate:
200g good quality white chocolate or cocoa powder
Pink food colouring (optional)
Edible glitter or lustre dust (optional)