Saturday, July 30, 2011

Hummus {With a Twist!}


Dips and crudites are perfect picnic food as they are so simple to make and easy to transport. For a change I've made a couple of variations to the ordinary plain hummus – Roasted Carrot and a Roasted Beetroot Hummus. Both delicious, healthy and perfect for sharing.

Roasted Carrot Hummus


The addition of the roasted carrots add a lovely sweet and earthy flavour to the hummus as well as giving the hummus a beautiful golden orange colour.

I'm not a huge fan of Tahini paste so I only add a tablespoon or two but if you like a stronger nuttier taste you can easily add more to the hummus. The tip for adding the ice cubes to the hummus was courtesy of Silvena Rowe in her beautiful book Purple Citrus and Sweet Perfume. It makes the hummus so deliciously smooth, however if you want the ultimate in smooth, remove the skins from the chick peas! I know, sounds crazy but it works, however you do need to have a little extra time on your side for that option!

2 carrots, peeled and ends trimmed
1/4 tsp chilli flakes (optional)
Drizzle of olive oil
1 tin of chickpeas, drained and rinsed
Juice of ½ - 1 lemon (depending on how juicy it is)
1 clove of garlic, crushed
1 tbsp tahini paste
Salt and Pepper
4 tbsp Extra Virgin Olive Oil, plus a little extra for drizzling
1-2 ice cube

Small handful of toasted pine nuts to serve (optional but delicious)

Pre-heat the oven to 400F/ 200C. Cut the carrots into equal sized pieces then put on a baking tray. Drizzle over a little olive oil and toss to make sure all of the pieces are evenly covered. Sprinkle over the chilli flakes if using and a little salt then roast in the oven for 40 minutes. Remove, then leave to cool.

To make the hummus blend all the ingredients together apart from the ice cubes in a processor until you have a smooth consistency. Taste to check the seasoning and whether you need any more lemon juice to taste. Add the ice cube(s) one by one with the motor running and blend until they are fully incorporated. Transfer to a serving bowl and drizzle with a little extra olive oil before scattering over the toasted pine nuts. Serve with toasted pita bread and crudités of your choice.

 
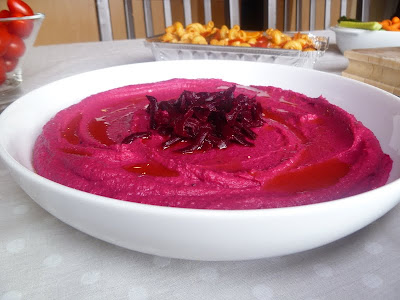
Beetroot Hummus

Okay, I'm not going to lie - the addition of the beetroot makes this hummus look slightly inedible! It is so unbelievably pink you wouldn't think it was natural but I promise you it is! Both adults and kids alike will love this vibrant, healthy and earthy dip which is perfect for picnics, parties (I once served it at a pink themed bridal shower!) and even just to have in the house for a healthy snack. I dare you to try it!

2 medium cooked beetroots (beets), roughly chopped* (plus a small one for garnish - optional)
1 tin of chickpeas, drained and rinsed
Juice of ½ - 1 lemon (depending on how juicy it is)
1 clove of garlic, crushed
2 tbsp tahini paste
Salt and Pepper
3 tbsp Extra Virgin Olive Oil, plus a little extra for drizzling
1 ice cube

Blend all of the ingredients together in a processor – with the exception of the ice cube - until you have a smooth consistency. Check for seasoning and whether you need any more lemon juice to taste. Add the ice cube and continue to blend until it is mixed in and you have a perfectly smooth dip. Transfer to a serving bowl and drizzle with a little extra olive oil and if you have extra some grated beetroot. Serve with toasted pita bread and crudités.

*You can use pre-cooked bought beetroot but try to get the vacuum packed beetroots and not the ones in vinegar as this will change the taste of the finished hummus. If you prefer however I always use fresh beetroot that I roast. To do this simply wash and trim the stalks then wrap individually in foil and cook in the oven at 200C/ 400F/ GM 6 from 60-90 minutes depending on size. Check them after 1 hour and if they are tender they are ready. If they are still firm return to the oven until they become tender. Leave to cool before peeling them then roughly chopping and adding to the hummus. {Warning: You might want to wear rubber gloves for the peeling and chopping part to avoid having bright pink hands! Also I tend to protect my chopping board with a double layer of wax paper!}

*One Year Ago - Peaches with Amaretto

Thursday, July 28, 2011

Spiked Roasted Pepper, Tomato & Chorizo Pasta Salad


Continuing with the picnic theme this is a delicious change from the usual pasta salad and a little treat for the adults! For a family treat miss out the vodka and if you prefer the Tabasco, but when you get the chance try this one as is- its a delicious alternative!

2 red peppers, de-seeded and cut into bite-sized pieces
1 yellow pepper, de-seeded and cut into bite-sized pieces
1 orange pepper, de-seeded and cut into bite-sized pieces
500g cherry tomatoes
1 small red onion, sliced
150g chorizo, sliced
1/2 tsp sweet paprika
2 tbsp balsamic vinegar
3 tbsp olive oil
salt & pepper
2-3 cloves of garlic, finely chopped
Sprinkle of Worcestershire sauce (approx. 1/2 tsp)
Good few shakes of Tabasco sauce
2-3 tbsp vodka
300g pasta of your choice
Drizzle of extra virgin olive oil

Pre-heat the oven to 400F/ 200C.

Put the peppers, tomatoes, sliced onion and chorizo into a large roasting tin. Sprinkle over the paprika then the balsamic vinegar and olive oil. Season with a good pinch of salt and pepper then roast for 50-55 minutes. Sprinkle over the garlic then roast for a remaining 5 minutes before removing from the oven. Drizzle over the Worcestershire sauce, Tabasco and Vodka then toss well before allowing to cool.

Cook the pasta according to pasta instructions then drain. Drizzle over some extra virgin olive oil then toss with the roasted vegetables and allow to cool. Just before serving taste to check the seasoning and adjust if necessary then scatter over the basil leaves and finish with a final drizzle of olive oil.

{This is also absolutely delicious served hot as a pasta main course, you just might want to cook a little extra pasta. Finish it off with some freshly grated parmesan for a perfect evening meal.}

*One Year AgoThe Classic Mojito

Tuesday, July 26, 2011

Scotch Eggs


As far as I'm concerned no picnic is complete without some Scotch Eggs. Perfectly cooked hard-boiled eggs encased in delicious and moist sausage meat then breaded and fried til golden and crisp – what more could you want!?!

Makes 6

8 large free-range or organic eggs
500g sausages
2 tsp sage, finely chopped
1 tsp thyme leaves
2 tbsp parsley, finely chopped
1 clove of garlic, crushed
Zest of 1/2 lemon
Salt & freshly ground black pepper
4 tbsp flour
150g breadcrumbs
Canola oil or other mild oil for frying – you need it to be roughly 2 inches deep

Tomato ketchup or HP to serve (optional)

Bring a large pan of water to a boil then carefully lower 6 of the eggs into the water. Cook for 8 minutes then remove from the water and transfer into a bowl of cold water. Leave to cool completely before peeling off the shells.

Remove the sausage meat from its casing and add to a mixing bowl along with the sage, thyme, parsley, garlic, lemon zest and a little freshly ground black pepper.

When you are ready to assemble the eggs crack the remaining 2 eggs into a large shallow bowl or plate and season with some salt and pepper. Beat well with a fork so its evenly mixed. Put the breadcrumbs onto another plate and set aside. Finally sprinkle the flour onto a small plate and arrange closest to you!

Divide the sausage meat mixture into 6 equal sized portions. I find what works best is to dust your hands with some of the flour then take one of the portions of sausage meat and put onto one hand and gently flatten to an even pattie. Dust over a little more flour – just enough to stop the it sticking to you then place one of the hard-boiled eggs in the middle. Gently work the mixture so that it evenly surrounds the eggs then then lightly roll in the flour. Dip the coated egg into the beaten egg mixture then finish off with the breadcrumbs. Set aside and repeat until all of the eggs are done.

When ready to cook, heat the oil in a large pan until it is 350F/ 150C on a thermometer. Carefully add the eggs – you might need to cook them in batches depending on the size of your pan – for roughly 7 minutes until evenly cooked through, turning half way through cooking. Remove from the pan and put onto a plate with some kitchen paper. Season with a little salt then leave to cool while you cook the remaining eggs.
They are delicious served warm or cold and with or without tomato ketchup or HP Brown Sauce – the choice is yours, but I guarantee if you haven't tried them before these will soon become a regular addition to your picnics!


Saturday, July 23, 2011

Pan Bagnat


It's that time of year when we get to enjoy the sun and eat outside and one of my favourite things to do is have a picnic. The great thing with a picnic is that you can really take along any food you like – if its a last minute thing where the sun has decided to make an appearance and you want to make the most of it then some bread, cheese, salamis and ham, pate and fruit make for a perfect picnic. If however its a planned event and you have some time, try out some new recipes and ideas – perfect for a special treat! And even if the sun decides not to cooperate, with these recipes you will be more than happy to enjoy them indoors as well!

Pan Bagnat


They key to a good picnic is that the food has to be easily portable. On top of that every picnic needs a good sandwich or two....so what could be better that a Pan Bagnat?! Don't be fooled by what looks like an ordinary loaf of bread – this is bread that has been hollowed out and filled with the most delicious fillings possible – the ultimate sandwich that is all compacted together in a loaf of bread! You can basically fill it with anything you like and if time isn't on your side head to your nearest deli for a selection of goodies to put inside. This hidden treasure will please everyone!


{It's hard to give exact quantities for this recipe as it will depend on the size of the loaf of bread you have but I always say its better to have too much than too little! Besides, any leftovers will make a perfect antipasti addition to the picnic!}

1 large loaf of bread – ideally round or oval
3-4 tbsp pesto or olive tapenade
Good few handfuls of rocket {arugula} and spinach – or other salad leaves of your choice
Thinly sliced char-grilled zucchinis/ courgettes*
Prosciutto
Char-grilled portabello mushrooms, thinly sliced**
Buffalo mozzarella, sliced
Salami of your choice
Roasted red peppers
Salt & pepper

Cut the top off the bread then carefully remove the majority of the loaf (keep the bread and make into breadcrumbs and freeze). Leave enough to keep the loaf intact but ideally you want it to just be a shell. Spread some pesto or tapenade all over the bottom of the loaf then simply start layering the ingredients! I like to start with a layer of salad leaves so that they get pressed down then simply go in the order as listed above. Season the mozzarella with some salt and pepper before continuing with the layers. Fill the loaf as much as you can – if you need to you can start repeating the layers. Finish by spreading the top of the loaf of bread with some more pesto or tapenade then fit it back onto the loaf. Wrap up and tie with some butcher's twine to secure.

When ready to serve either slice the loaf as you ordinarily would of if you prefer and have a round loaf of bread you can cut it into wedges – either way you are guaranteed a delicious sandwich!

*For the zucchinis (courgettes) I found some lovely small Italian ones that I simply thinly sliced lengthways then drizzled with some olive oil. We grilled them on the BBQ but you could easily use a griddle pan until they had nice char marks and were perfectly tender then finished them off with a spritz of lemon juice and a sprinkle of salt and pepper.

**For the mushrooms, again I drizzled over a little olive oil then cooked them on the BBQ until they were lightly charred, tender and juicy. Finish them off as with the courgettes with some lemon, salt and pepper then slice into thin slices.

*One Year Ago - Lemon Icicle

Thursday, July 21, 2011

Artichokes with Garlic Butter Dipping Sauce


As with cherries, artichokes are another seasonal treat well worth waiting for! I get so excited when artichokes are finally in season again. For me they are the ultimate spring and summer treat and make a delicious and elegant starter when the leaves are dipped into an indulgent garlic butter sauce. Don't be put off by them if you have never cooked your own before – this is a great recipe for starting off and getting used to them. Easy and delicious – this is seasonal food at it's best!

Serves 2 (easily doubled)

2 globe artichokes
½ lemon
100g butter
1 fat clove of garlic, crushed
1-2 tbsp white wine
Salt & freshly ground black pepper

Trim the bottom off the artichoke stalks and remove any tough leaves from the bottom.

Using a large pan add a couple of inches of boiling water then add a squeeze of lemon juice. Put a steamer on top of the water and steam the artichokes for 45-60 minutes until tender. (If you don't have a steamer you can just put them straight in the water.)

When the artichokes are almost finished steaming make the garlic butter dipping sauce. In a small saucepan add the butter along with the garlic, white wine, a little lemon zest and a little salt and pepper. Gently heat until melted then keep warm until ready to serve.

When the artichokes are ready {the leaves come away easily when pulled} remove from the pan and allow to cool slightly before serving. To eat the artichokes break off a leaf then dip the broken part (the bottom) into the garlic butter then gently 'scrape' the tender flesh away with your teeth. The closer you get to the heart of the artichoke the more tender the leaves become so you can eat more! Once you get to the heart of the artichoke remove the hairy 'choke' (I just use a teaspoon) then you can eat the heart which is by far the best part! The ultimate spring treat!

*You could also serve my cheat's aioli as a delicious dipping sauce for the artichokes or for a slightly healthier choice a Spanish Romesco sauce or for the ultimate in decadence serve with some rich hollandaise sauce!

*One Year Ago - Proscuitto Wrapped Chicken Stuffed with Mozzarella & Pesto

Tuesday, July 19, 2011

Cherry Ripple Ice Cream


Cherry season arrived later than usual in BC this year, but I'm delighted that they are now here in full force! Since I spend so long in between seasons waiting for cherries the first bag I buy are simply enjoyed as they are – for me there is nothing better on the table than a big bowl of fresh, juicy cherries! After that though it's time to create lots of different things with them and first up is my Cherry Ripple Ice Cream! This is the perfect indulgent treat for making the most of seasonal cherries.

This recipe uses my basic Vanilla Ice Cream recipe with a little less vanilla in it then finished with a swirl of deep, crimson red cherry puree....decadent and completely delicious!

Thursday, July 14, 2011

Steak Sandwich with Red Onion Marmalade

This is definitely a favourite in our house. It is ideal as a Friday night treat for the two of us (recipe halved) but it has also proved to be an extremely popular meal for family and friends. If you want a more substantial meal, serve this with some fries or potato wedges, or I've even served it with some stuffed mushrooms, however I find it's also great by itself or with a nice green side salad.

{It's hard to give exact quantities for the sandwiches as it depends on how big you want them to be but for 4 people 1 quantity of cheat's aioli and 1 of the red onion marmalade will definitely be enough.}


Serves 4

2 steaks of your choice – I used strip loin but sirloin also works well
1 French baguette or similar bread of your choice
Olive oil
Cheat's aioli (or you could use garlic mayo)
Rocket leaves
Salt & pepper

Season the steaks with a little salt and pepper on each side. Heat a frying pan with a drizzle of olive oil then cook the steaks for 3 - 4 minutes per side for medium rare (or you could cook them on a BBQ like we do for the same amount of time). Transfer to a chopping board, cover loosely with tin foil then leave to rest for 10 minutes. Drizzle a little oil over the bread and toast for a few minutes until golden.

To assemble the sandwiches spread a good amount of the aioli on the bottom of the baguette then top with a handful of the rocket leaves. Thinly slice the steak and place on top of the rocket. Add any juices from the steak to the onion marmalade then spoon some over the top of the steak.

Tuesday, July 12, 2011

Red Onion Marmalade


This onion marmalade is a great recipe to have on hand. It takes under 1 hour to make and goes with so much. My favourite is to have it on my Steak Sandwich with Red Onion Marmalade but it is also delicious on a pizza with blue cheese (or goats cheese) and some sliced sausages, and of course quite simply with cheese on crusty bread. Make up a batch and keep it in your fridge for a delicious and easy meal!

Monday, July 11, 2011

And the Winner Is.........

Well we did it – I reached over 200 Facebook Fans! Thank you to everyone that helped and a big hello to all of my new followers – both on Facebook, my blog and Twitter. It has been great fun and I've really enjoyed hearing from you all! I hope you continue to enjoy Vanilla Clouds and Lemon Drops – I've got some great new recipes coming up so stayed tuned!


And now to the important stuff! As promised as a thank you to everyone that follows my blog I held my first giveaway! I combined all of the Followers from Facebook including Pages that like Vanilla Clouds and Lemon Drops with my Google Friends Connect Followers and everyone that re-tweeted the giveaway to get a grand total of 326 (!). I used random.org to pick the number and I am delighted to announce that the winner of the beautiful cookbook, Citrus and Spice by Sybil Kapoor goes to..........

{Drum roll please..........}

Number 163..........

Carla N' Kyle Wilkinson!

Carla N' Kyle can you please email me your address to vanillacloudsandlemondrops@hotmail.co.uk so that I can get the book into the post for you as soon as possible! Congratulations and thank you again to everyone!

{Apologies – when I tried to get the Random.org widget I messed up and lost it so you're going to have to take my word for it with the winning number!}

Friday, July 8, 2011

Frozen Strawberry Daiquiris


About a month after I bought my ice cream maker I discovered another great new use for it – frozen cocktails! It produces delicious frozen drinks in 25 minutes – what more could you want on a Friday night! If you don’t have an ice cream maker but want the same consistency simply freeze a batch up a day earlier omitting the alcohol which you can add just before you serve it, and if that still seems like too much work or advanced preparation, for an easy and immediate frozen drink, mix everything in a blender with lots of ice – it won’t be quite as good, but good nevertheless!

600g cleaned & hulled strawberries (approx. 500g after hulled)
125 - 150ml sugar syrup*
3 juicy limes (you will need 6tbsp of juice) plus 1 lime for garnish
200ml white rum (such as Bacardi)

Roughly chop the strawberries and add to a blender along with the sugar syrup and lime juice. Taste to check the balance of sweet and sour is ok then put in an ice cream maker and churn (according to your instructions) for roughly 25 minutes. Add the rum and churn for another minute or so until it is even mixed then serve immediately in cocktail glass with a slice of lime.

*As mentioned in my post for Limeade, in the summer I always tend to have a jar of sugar syrup in my fridge as I use it for so many different drinks. To make it, simply combine equal quantities of sugar and water (I usually do 1 cup of sugar and the same of water) in a pan and bring to a gentle simmer. Once all the sugar has dissolved let it cool and use as needed.


Wednesday, July 6, 2011

Giveaway!

As previously mentioned, as a thank you to everyone that follows my blog I have my first ever giveaway! For one of you lucky readers you can win a copy of the beautiful book, Citrus and Spice by Sybil Kapoor. This seasonal book is divided into months, with each month featuring a specific flavour which pairs perfectly with available monthly seasonal ingredients. January is matched with the clean and refreshing tastes of citrus, perfect after the over-indulgence of December. All months follow suit with chapters dedicated to Cream, Floral, Fruit and Spice, along with some more interesting flavours such as Ozone, Earth, Toast and Smoke (see if you can guess the themes to the correct months!).

Beautiful recipes are accompanied by irresistible photographs that make you want to try them all. It was hard to narrow it down since there are so many delicious recipes but some of my favourites are Raspberry Rosewater Ice Cream; Barbecued Pork with Chinese Spiced Plum Sauce; Chargrilled Soy Chilli Chicken; Buckwheat Pancakes with Apples and Calvados Cream and Toasted Tea Cakes – to name a few!

For your chance to win this stunning book all you have to do is one of the following:


Re-tweet this competition on Twitter for an additional entry (and send me a quick message to say you've done so)

There - that easy! As soon as I reach 200 followers on Vanilla Clouds and Lemon Drops Facebook page I will randomly pick a number from all of the Facebook followers and blog followers combined. To enter more than once simply follow both my Facebook page and the blog and if you are a twitterer re-tweet!

*To all of you that are already followers you are already entered into the competition but please feel free to mention it to any family and friends that you think would enjoy reading Vanilla Clouds and Lemon Drops.

Thanks everyone – let's get 200 followers (not many more are needed!)

**This competition is open to everyone.

*This giveaway is now closed*

Tuesday, July 5, 2011

Elderflower & Raspberry Jelly


I love elderflower juice, especially sparkling elderflower and this is exactly what I use for this deliciously fragrant, light and refreshing jelly, ideal for lazy summer nights in the garden! If you can, try and make this the day before you want to serve it so that it has time to set properly.

I like to serve mine in individual glasses but if you prefer you can make it in 1 large jelly mould.

{Makes 4 individual glasses}
 6 gelatine leaves (I use Fine Leaf Gelatine – Platinum Grade)
750ml sparkling elderflower juice
40 fresh raspberries (approx. - you don't have to be too specific but around 10 per glass works for me)
Edible gold glitter – a totally optional and extravagant touch

Soak the gelatine in cold water for 5 minutes. While the gelatine is soaking pour the elderflower juice into a pan, cover with a lid and gently warm up to almost boiling. Remove from the heat then take the softened gelatine out of the cold water and squeeze out any excess water. Add to the elderflower juice and stir quickly to melt and combine. Transfer into a large pouring jug and leave to cool.

If you have time and want to create a jelly that has has raspberries all the way through it pour a little of the jelly mixture into each glass (or into 1 large mould) then add a few raspberries. Put in the fridge and leave to set then repeat, layering until all of the jelly and raspberries are used up.


Related Posts Plugin for WordPress, Blogger...